Not Carrying Over Hidden Body to Drawing Fusion
I've been instruction Fusion 360 beginners for a few years at present and I often get asked the same questions. This page serves as a place to respond some of the most frequently asked questions by Fusion 360 beginners.
It is important to note that these frequently asked questions are not in order of how many times they've been asked. I've simply practical a number to each of them so they are easier to reference.
Table of Contents:
- Why Are My Components Grayed Out?
- Why Are There Departing Lines on My Model?
- Why Exercise I Not Have Tangent Reference Lines?
- Does Fusion 360 Require the Internet?
- How Practice I Save My Files Locally?
- How Do I Preview New Features?
- How Exercise I Re-enter the Sculpt Environment?
- How Many Faces Tin can a Mesh File Have?
- How Do I Change My Navigation Preferences?
- Why Is My Z-axis In the "Upward" Direction?
1. Why Are My Components Grayed Out?

Whether y'all've been using Fusion 360 for a day or for a yr, hopefully, you're familiar with the concept of components. To summarize, you tin can think of components as reusable parts or something that would exist in the existent globe. To learn more almost the components yous tin watch my video on the divergence between components and bodies.
When yous're working with design files you'll need to actuate one component in social club to work on it. So, all of the other components will automatically take a lower opacity.
This is done by default and is intended to make it easier for y'all to focus on the component that yous have active, since that is, in fact, the component you're supposed to be working on.
If yous activate the top level component, you lot'll see that all the components within your associates file volition appear to be active – or have 100% opacity.
This seems to catch a lot of users off-guard since other CAD programs don't accept this feature. All the same, this was implemented because of Fusion 360's top-down nature, where you tin can build all of your parts (as components) directly within your assembly file.
Turning Component Visibility On And Off
Click on your username in the upper righthand corner and select the "Preferencedue south" option from the dropdown list. This volition open up up your Preferences dialog. From hither, you'll have to select the "Design" tab on the left-hand side.
And so, to turn this feature on/off y'all'll just demand to cheque or uncheck the "Agile Component Visibility" option, which is at the very top of the list. If you lot practice check or uncheck this choice you'll have to striking the "apply" button. Y'all'll also have to restart your Fusion 360 in society for the changes to take effect.
two. Why Are There Departing Lines on My Model?
To answer this question nosotros'll have to take a look at the Visual Style settings. The Visual Style settings tin can be found past heading to the Display Settings folder at the bottom of your Fusion 360. Select the Display Settings icon, which is the reckoner or monitor icon. So, y'all'll see the Visual Style settings all the way at the top of the list.
When yous hover your mouse over the Visual Manner flyout folder, y'all'll see there are half dozen dissimilar fashion options.
- Shaded – shows the model shaded without any lines
- Shaded with Subconscious Edges – shows the model shaded with contour lines that announced on the other side of the model
- Shaded with Visible Edges Only – shows the model shaded with contour lines that appear only on the outside or front end side of the model
- Wireframe – shows all contour lines of the model with a wire outline and no shading
- Wireframe with Hidden Edges – shows the model with a wire outline, no shading, and subconscious contour lines
- Wireframe with Visible Edges But – shows the model with a wire outline and no shading
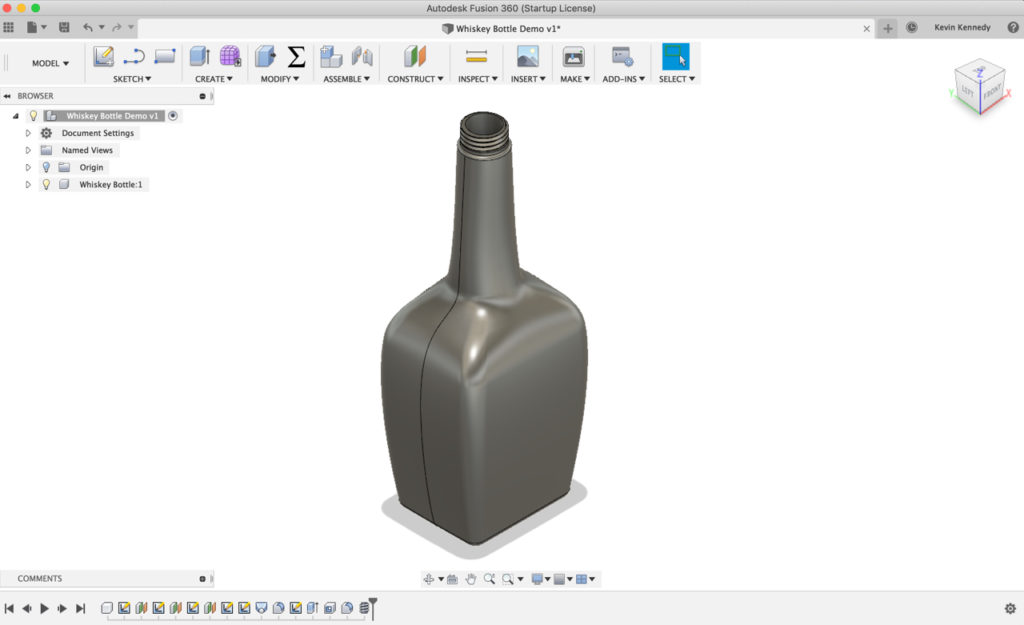
By default, the Visual Style is set to "Shaded with Visible Edges Just". This is also the setting that I utilise when I record my tutorials (unless I specify otherwise).
You'll see when you have the "Shaded with Visible Edges Only" option checked that it volition shade your model to make it look a bit more than realistic. Information technology will besides add some contour lines on the sides (as pictured above on the left side of the whiskey bottle).
To clarify, these contour lines are simply a visual setting. They practice not affect your model at all. They will Not be printed out or shown if y'all export the model and put information technology in some other plan. The lines are simply there to help y'all better sympathize the geometry of your model.
If you don't want any lines on your model at all then yous can select the "Shaded" option. Later selecting the "Shaded" pick, you'll discover the profile lines get abroad.
Of course, you tin can as well select the "hidden lines" choice to encounter all of the subconscious profile lines of your model – or the lines that aren't on the exterior of your model.
3. Why Exercise I Non Have Tangent Reference Lines?
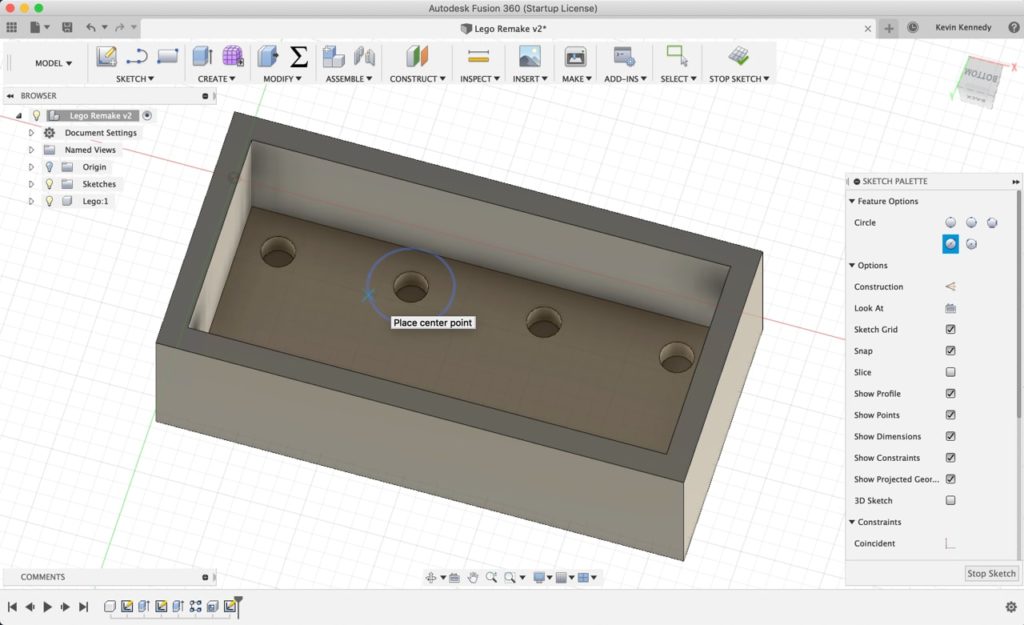
"Motorcar project edges on reference" setting turned on.
In regards to my lego brick tutorial, or the first day of the xxx-twenty-four hours series, a lot of people have commented that they can't describe the circles on the lesser by snapping them tangent to the circles on peak.
Unfortunately, in that location is a setting in your preferences that used to be included in the default settings. I always use the default settings when I tape my tutorials (unless specified otherwise). For some reason, the Fusion 360 engineers recently decided to not include this characteristic equally ane of the default settings. To be honest, I actually don't know why they decided to omit it, as it's a very helpful characteristic.
Auto projection edges on reference
To turn this feature back on you'll want to click your "Username" in the upper righthand corner and so select the "Preferences" card. Then, in one case again we'll select the "Pattern" tab on the left-hand side.
In the Design carte du jour, you'll want to check the "Machine project edges on reference" setting. Y'all'll and then take to hit the "utilize" button and you lot'll take to restart your Fusion 360 in order to get this setting to piece of work.
I should too indicate out that because the default settings alter on occasion, I've put together another page right here on my website to certificate these important settings.
4. Does Fusion 360 Require the Net?
The true answer to this question is aye – Fusion 360 does require the internet. All the same, you tin go into an offline mode for two weeks at a time.
This is probably 1 of the most debated subjects of Fusion 360. The reality is that Autodesk is pushing to have everything in the cloud. Fusion 360 is, in fact, a cloud-based product. It requires you lot to connect to the cyberspace since the storage organisation, where all your files are located, is cloud-based – as well every bit many of the other core features.
The folks at Autodesk refer those who don't want to use the deject to apply their other production, Autodesk Inventor. I think this makes it pretty clear that Autodesk has no intention of changing the cloud-based aspect of Fusion 360 (at to the lowest degree anytime presently).
Working In Fusion 360'due south Offline Mode
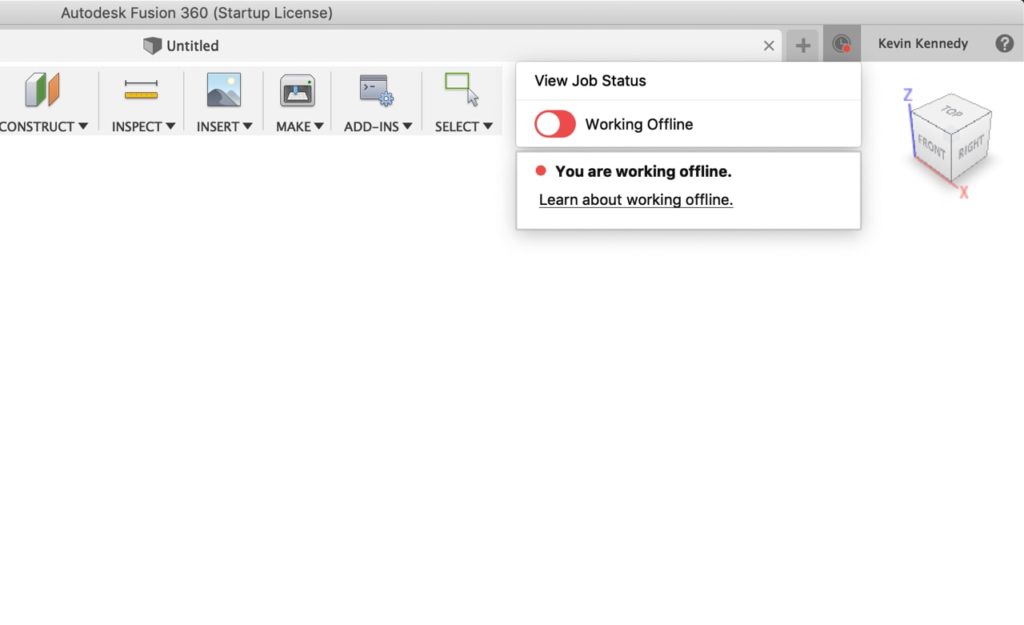
Let's take a wait at how yous can work offline and some important things to know about offline manner. If you lot click the clock icon in the upper righthand corner yous'll run into your task status, which includes a toggle for "Working Online" or "Working Offline."
There are four main reasons yous'll be in offline mode.
- Service Maintenance – There are occasionally maintenance updates that are scheduled. Don't worry, you'll be notified in advance.
- Unexpected Outage – Something on Autodesk's cease is non working. You'll exist placed in offline mode automatically.
- No Internet Connection – If your cyberspace is down, or you tin't connect for some reason, then y'all'll be placed into offline fashion. Fusion 360 will warn yous that yous're in offline mode afterwards information technology fails to connect.
- Manually Switching to Offline Style – You'll exist in offline style any time you toggle the switch to intentionally go into offline fashion. You can do this when yous're out and almost and don't accept a stable internet connection.
Caching Deject-Based Files
Yous're probably wondering how you can access your cloud-based files if you're not continued to the cloud. This is where the enshroud comes into play.
If you look in your preferences y'all'll notice there's a enshroud setting. Select your "Username" in the upper righthand corner. Select the "Preferences" carte. Then, y'all'll desire to await at the third pick on the listing. You'll see that y'all tin can gear up this option to a time menstruation by a number of days that will be automatically cached.
For example, if yours is ready to 15 days, then the final 15 days worth of files and changes will be cached to your local auto.
Manually Caching Files
If y'all open up up the data panel while in the offline mode, y'all'll meet that many of the recent files await normal. This is because in that location's a cached copy of the file on your local machine. However, if you continue scrolling down you lot'll run into that files first to get grayed out considering the files aren't accessible, as those are files that haven't been cached. Which means if yous're in offline mode you won't exist able to admission them.
If you're ever planning on working offline then yous can ensure that sure files are cached by right-clicking on them in the data panel and selecting the "Add to Offline Enshroud" option.
5. How Do I Save My Files Locally?

You won't exist able to save your files locally in a similar manner every bit other programs that yous're probably used to. This is because of the cloud-based approach that Autodesk is pushing with Fusion 360. However, you tin can still export your files into a number of popular formats. You lot'll be able to cull where they're saved to on your local car.
To consign your files just click the "File" menu, then select the "Consign" option. You'll then encounter in the "Export" dialog box that there are a number of file types that you can export as.
I want to betoken out the starting time file type on the list, which is the Fusion 360 archive file or .f3d. This file is Fusion's native file format, which is the same format that the cached files will be on your computer. Therefore, I always recommend exporting every bit the .f3d format if you're exporting for the sake of having backups or local files on your calculator – with the intention of merely using them in Fusion 360.
Obviously, if you're planning on using the file with another piece of software then you may want to choose some other file type that is ameliorate suited for your needs.
To reopen a file yous can merely get to the file bill of fare and select the open selection from the listing. Then, select the file from your local machine. Alternatively, you can upload the file to your data panel, directly to the binder that y'all'd similar to place it in. Only open the folder yous desire the file to exist in then select the blue upload push button. Select the file and click the upload button again to initiate the upload.
The available file formats are:
- SAT
- IGES
- SMT
- STEP
- Fusion 360 Archive File (F3D, F3Z, F2D)
- DWG
- DXF
- STL
- FBX
- Sketchup
- OBJ
vi. How Do I Preview New Features?
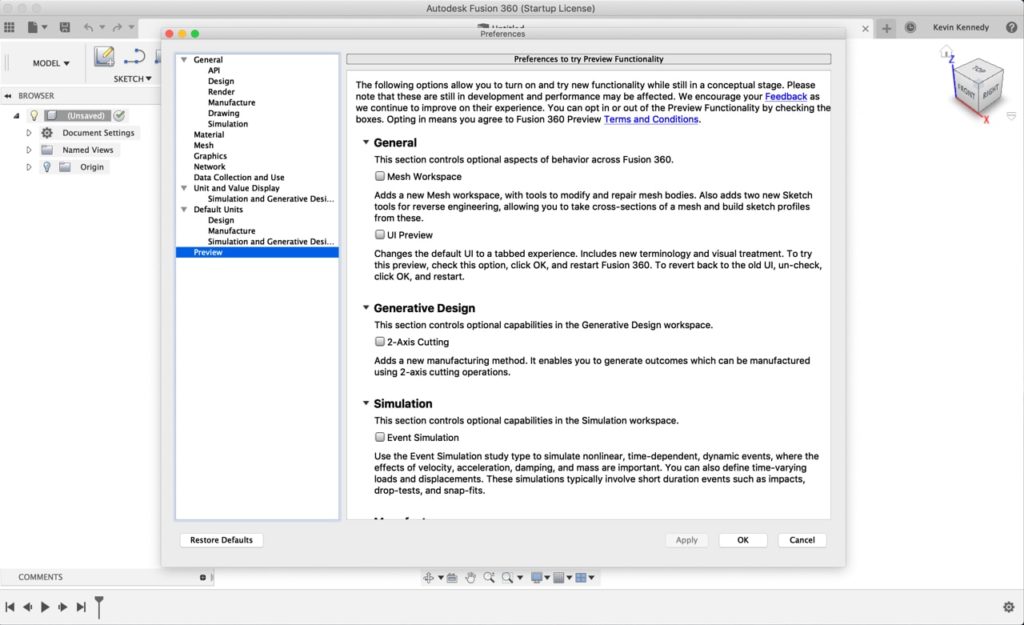
Select your Username in the upper righthand corner and then I'll select the "Preference" choice from the dropdown list. Then, you'll have to select the "Preview" tab on the lefthand side.
On the Preview tab, you'll be able to plough on/off different functionality that is in beta testing. For instance, many of you have seen or tried out the UI preview, which is the newer user interface that Autodesk is looking to implement (at some point). You may have even seen this user interface design in some of the Autodesk Fusion 360 tutorials.
Information technology is of import to notation that these preview functionalities are not fully-pushed out withal. Often times they're not fully released for good reasons. Therefore, I highly recommend that you lot utilise them with caution. The preview functionalities oftentimes accept bugs or may cause your Fusion 360 to crash or lose other functionalities.
As always, if you decide to modify whatsoever of the preview settings and then you'll take to "apply" the settings and restart your Fusion 360 in order to go them to testify upward.
seven. How Practice I Re-enter the Sculpt Environment?
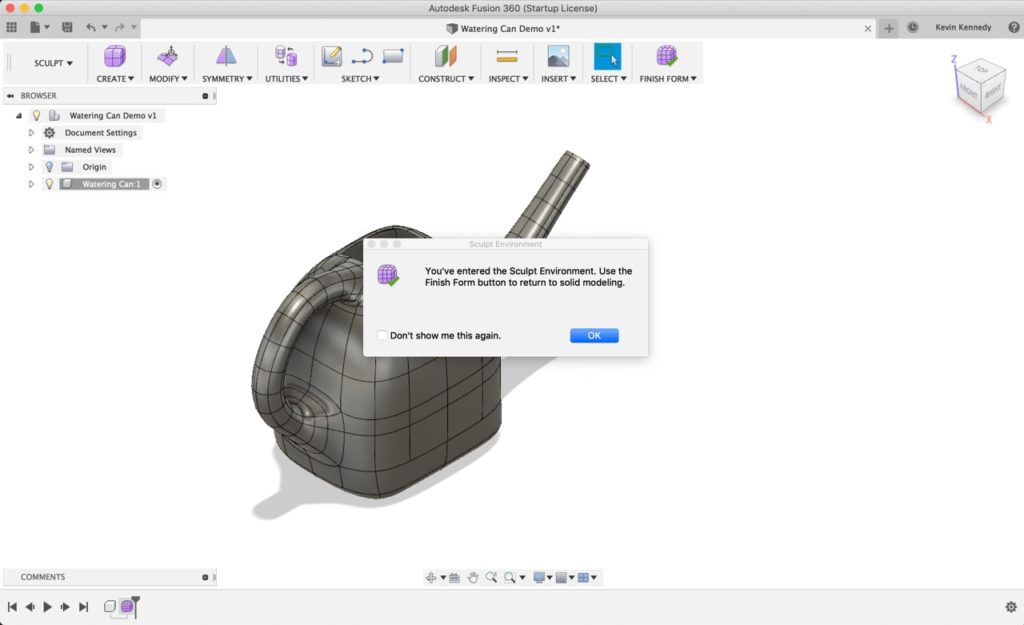
I'll concord that it can be a piddling disruptive when yous're working in the Sculpt Environment and you lot want to switch back and along betwixt the Model Workspace.
Most users recall that the Sculpt Environment should be available in the workspaces dropdown list. Nevertheless, you lot tin think of the Sculpt Environment as an extension of the Model Workspace. This is why I try to refer to it as an "environment" and not a "workspace."
If you're ever wanting to get back into the Sculpt Environs and so you'll just need to double-click on the sculpted class icon (that regal cube icon) in your Fusion 360 timeline. This will open up upwardly the Sculpt Surroundings and you'll be able to continue to use the t-spline sculpting tools.
It's also important to note that you'll take a carve up Sculpt Environment for each private sculpted piece that you create. If you lot have multiple sculpt icons in your timeline and then you'll want to make sure you select the correct one earlier you attempt to edit the desired sculpted trunk. Otherwise, the other sculpted bodies will appear grayed out, as simply the bodies in the agile sculpt environment will accessible.
8. How Many Faces Tin can a Mesh File Take?
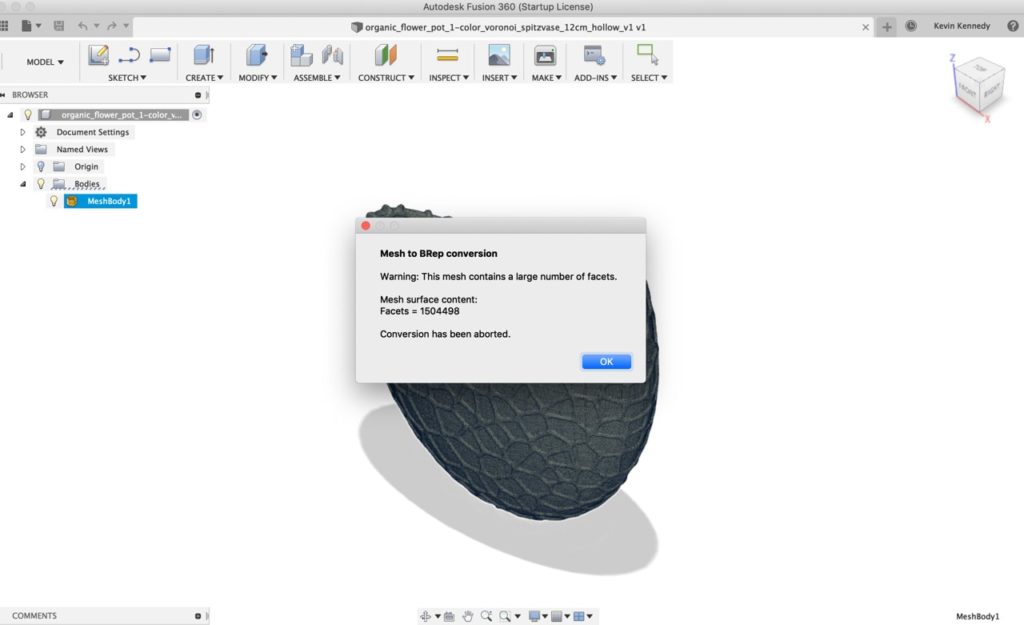
In regards to converting STL files to bRep solid bodies, I frequently get asked what is the maximum number of faces one can convert? For those of yous that utilize Fusion 360 for 3d-press purposes, you've probably found yourself wanting to convert a Thingiverse file to a solid body then you can customize or alter it.
Frequently times, the conversion won't piece of work in Fusion 360 and it will give you lot an error that there are as well many faces or triangles. The full general dominion of pollex is that the file can't have more than than 50,000 triangles or faces, otherwise Fusion 360 won't be able to procedure information technology. With that said, I recommend shooting for 30,000 faces or less, as you'll become much amend results. The chances of your software crashing will besides exist significantly lower.
If your file does have more than than l,000 faces then I recommend you cheque out Autodesk Meshmixer (also free). Meshmixer was built to work with mesh file types, hence the proper noun. You'll be able to lower the number of faces in Meshmixer and then import the file into Fusion 360.
Here'due south a video where I hash out converting STL files to bRep solid bodies.
9. How Practice I Change My Navigation Preferences?
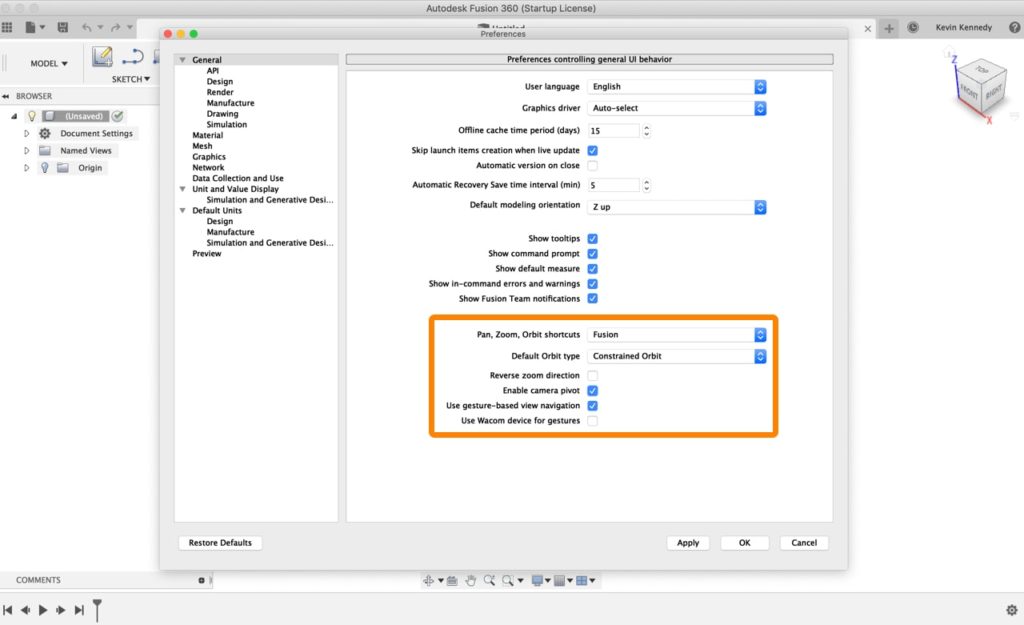
Click on your Username in the upper righthand corner. And so, select Preferences from the dropdown list. You'll then find a few unlike settings that you can change to better set up your navigation workflow for your specific needs.
Under the general tab, you'll see that you can "reverse the zoom direction". Yous can check this setting if you want your mouse wheel to zoom in the opposite direction.
But above that setting is the "Default Orbit type." The orbit tool tin can be accessed past property downward the shift key on your keyboard while moving your mouse around. Alternatively, y'all can select the orbit tool at the bottom of your screen. When yous select it at the lesser you'll discover that you lot can select a constraint orbit, which orbits the model based on a specific point, or you can select free orbit which lets yous freely motion the model effectually.
If you find yourself using one of these orbit tools over the other then yous can set this preference to your desired orbit setting. This will so be the default when you use the orbit function with your keyboard and mouse.
Adjacent, y'all'll see above the orbit setting that you tin can actually set your navigation preferences based on a few other CAD packages. This can be extremely helpful if you're coming from Alias, Inventor, Solidworks, or TinkerCad.
After you apply one of these other settings you'll observe the navigation will mimic the default settings of the selected software. However, it'southward important to annotation that at that place are some differences in functionality between all of these CAD packages so not everything will work 100% similar the other. This is a practiced way to span the gap, especially for those of you that still utilise another program.
If you're looking to really speed upward your workflow then I highly recommend the 3Dconnexion SpaceNavigator 3D Mouse.
10. Why Is My Z-axis In the "Up" Direction?
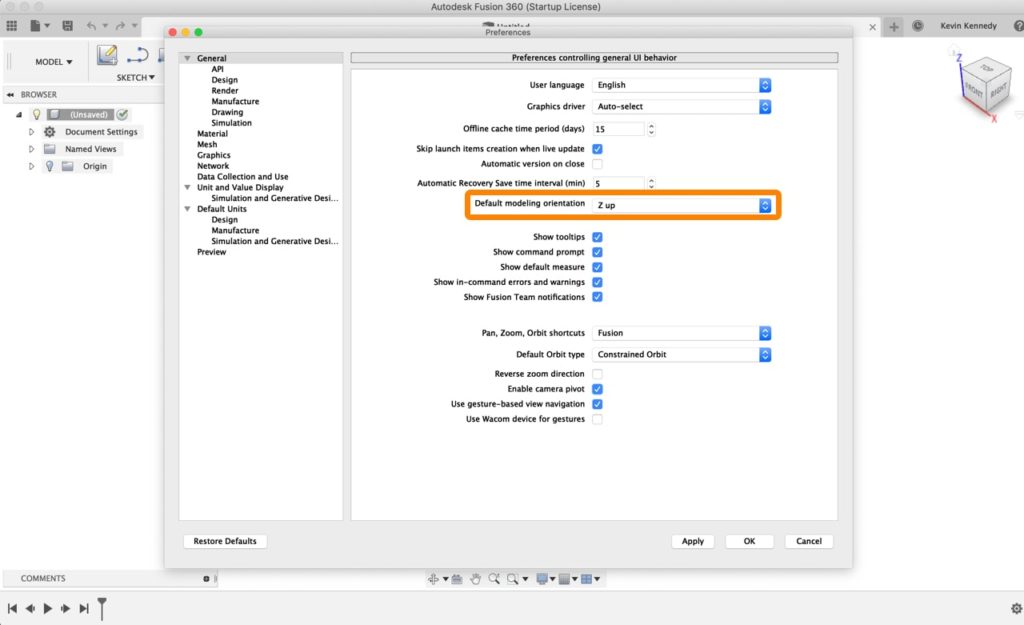
If you lot wait at your viewcube in the upper righthand corner you lot'll notice that it's probably set to the Z-centrality beingness the vertical centrality. This is because the Z-axis is currently the Fusion 360 default. Yet, when I outset started creating tutorials the Y-centrality was the default "up" orientation, which is why I often get questions on how (or why) to change this.
The important matter to note with this Z versus Y orientation is that when yous change this setting, it will merely affect all futurity pattern files. Unfortunately, changing this setting does not change information technology for the files that y'all currently have open.
Reset the Front and Top Faces
However, there is a small workaround to mimic the reorientation of your model. You tin can reset the elevation and front views of your model by selecting the caret icon that shows upward side by side to the viewcube. And then, select the "set current view as" flyout folder, which lets yous fix the "front" or "top" face.
If you lot set the front and top faces, you lot'll be able to reorient your model, without having to rotate it using the move command. The move command is often difficult to get exactly right.
To summarize the Y vs Z-axis orientation, I also desire to point out that information technology really doesn't accept much effect on your actual model in Fusion 360. The only departure is really the orientation of your model, which is often important only after yous export your model for something else, such as a 3d-printer's slicing software.
This is the reasoning for the Fusion 360 Engineers irresolute the default to the Z-upwards orientation. They found that virtually of their users were using 3d-printers or CNC milling machines, which both typically apply the Z-axis up, as it all-time represents the 3rd dimension.
Source: https://productdesignonline.com/fusion-360-tutorials/10-questions-fusion-360-beginners-always-ask/